Transitioning to Modern Transmissions Prt 3


Posted By John Katz, June 25, 2012 in E-News, Engine & Drivetrain

Part 1  http://wp.me/pKHNM-1cL
Part 2  http://wp.me/pKHNM-1cL

From www.hotrodandrestoration.com

Switch Shifters

With manual transmissions in demand, it isn’t surprising to find that a fair number of vehicles—particularly muscle-era vehicles—that left the factory with an automatic transmission are being rebuilt with a manual. Frederick estimated that about 60 percent of American Powertrain’s classic muscle car customers are replacing an automatic transmission with a manual.

“[The conversion] is time-consuming, but not terribly complicated,” Frederick said. “Most of the parts bolt in.”

“It isn’t for the faint-of-heart or for anyone short on patience, but it’s do-able,” Hill added. “It’s just a matter of working through the process.”

Obviously you’ll need a pedal assembly; fortunately, according to Hill, there are a lot of aftermarket units that work quite well.

“That also gives you the option of using a hydraulic release bearing instead of a mechanical clutch linkage, which, depending on the application, can have some advantages,” Hill said. “It’s going to take a longer or shorter drive shaft. It’s going to take a different yoke on that driveshaft. The power bushing in the motor for the transmission input shaft may have to be changed. The starter could be affected by the diameter of the flywheel you put into the vehicle.

“You start at the back of the crankshaft and start matching componentry as well as possible—and if you can’t match it, then you have to compensate for it,” Hill continued. “I don’t think we’ve ever run into something we couldn’t convert, as long as we’re talking about American muscle.”

Many of the same issues crop up even when swapping one manual for another—for example, the customer who has a 454 and a Muncie and wants to put a modern six-speed in it.

Like many other projects, it’s significantly easier with older (i.e., pre-computer) hardware. If either the engine or the transmission came with computer controls, it gets a little more involved. And keep in mind that even some modern manuals now have computer controls—the GM transmission that comes with the LS engine, for example, with its skip-shift function.

Of course, some customers will want to go the other way and replace a factory manual with a new, high-tech automatic.

“It’s most important to make sure you have all the correct components—and that you make the finished job look appealing to the customer,” said Poff of TCI. “It’s the mounting that’s most likely to give you trouble.”

According to the experts, you’ll need to ensure that you have the right crossmembers and that there’s enough room inside the tunnel.

“There is no one-size-fits-all solution; every application is unique,” added Poff. “But once the physical installation is accomplished, it’s pretty straightforward to make everything operational.”

Either way, Nichols suggested finding out from the customer how critical it is to keep the car looking original, versus the cost to locate and install all of the correct original components.

As with so much else in hot rodding, the best results generally come from purchasing and installing complete systems.

“That goes for any product from any company in this business,” Frederick said. “We say, ‘Look, we have a turnkey kit. We figured it all out, and all you to do it plug and play.’ Buy it all from one source and you know all the parts are going to work together.”


Thanks for reading.

Tim


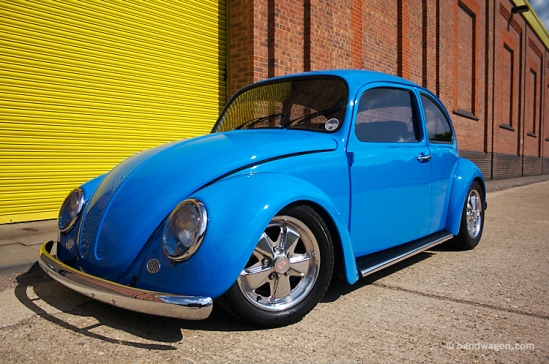
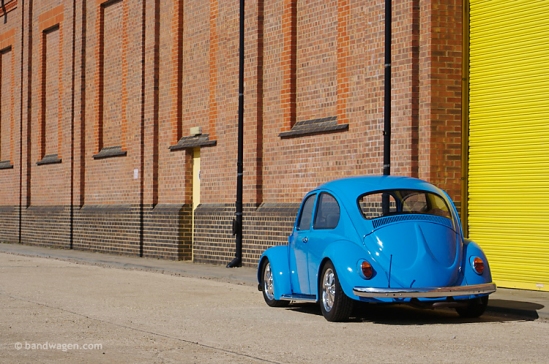
My Blue Beetle – Posted by Malc

Do you like VW‘s?  Then you’ll love to visit  http://bandwagen.wordpress.com.   This is a great looking bug!!!  I’m glad he didn’t turn it into a drag car.

This blue Cal-look beetle was in my life for twenty two years. I purchased it with a friend back in 1988 with the intention of building a drag-car to enter the recently formed VWDRC. The basic plan was to weld up the doors, cut off the roof, fit a roll-cage and run a more or less stock 1600 engine on methanol and nitros oxide… this was back in a time when you could pick up as many used and running engines as you wanted, for around £50 each! The car only cost us £100 so we figured as long as we got a few quarter-mile runs out of each engine before they blew, it would be fairly inexpensive but fast fun!

As you’ve probably guessed from the pictures, the plans changed drastically when my friend lost interest in the bug. Thank god he hadn’t got around to hacking the roof off! I bought his share in the car and decided to use it as the basis for a Cal-look project. Over the next couple of years I started collecting parts and in 1990 it went into the body shop to fit the early panels, some de-chroming and a respray in Ford electric blue.

Once painted, I rented a small, two-car barn on a local farm with another friend who was also working on a project beetle. The bug slowly  came together over the following eight years. I’d work on it when time and money allowed which wasn’t too often – I was in my 20s and money was tight so there were usually other things that had to take priority, like paying the mortgage and food!

After a final push it was all together and driving in 1998 and I made it along to the Stonor Park VW show that year. Things have been updated and changed over the years including the addition of the 4″ narrowed beam in 2009 which was just before I decided to sell it. This beetle only covered 8,500 mile in the 22 years that I owned it which must be some kind of record! It’s still fairly local to me and owned by a friend of the guy who bought my ’72 Bay-window camper, but as they say, that’s another story…

Body:
Pre-67 front and rear valances, early wings and lights (US-Spec fronts containing orange indicators)
Long-bonnet and glass W-decklid.
Cal-look window rubbers.
De-chromed with smoothed/hidden catches on front and back lids.
Grey tinted one-piece door glass and matching rear side glass.
Stainless-steel blade bumpers.
Bodywork and paint by Paulespury coachworks in 1990 (still looks great!)

Running gear:
New front suspension set-up fitted by Sayed @ Batts VWs in 2008 comprising of:
4″ narrowed and adjustable front beam, custom built by Gavin @ Trailer Queen Restos
CB Dropped spindles
New KYB Front shocks
Long-travel ball joints
Rear…
Adjustable Koni shocks.
New IRS gaiters
Type 3 IRS Gearbox
UVA Adjustable rear spring plates.
Copper brake pipes fitted throughout
Standard drums and disks re-drilled to Porsche 5-stud (VW 4stud fitment still retained as well)

Wheels & Tyres:
Fully-polished early Porsche fuchs, 5.5×15 fronts and spare with 185/55R15 Continentals
Original deep 6×15 rears with 185/65R15 Nankangs

Engine:
Built by Sayed @ Batts VWs and fitted in Feb 2000 (only done 6K miles!)
1641cc fully balanced.
Twin 36 IDF webber carbs with hex-bar linkage.
Engle 110 Cam.
040 Cylinder heads.
Hi-volume oil pump.
Remote oil filter with braided lines.
009 Distributor and Bosch blue coil
Polished, louvered stainless firewall.
Engine tinware painted electric blue.

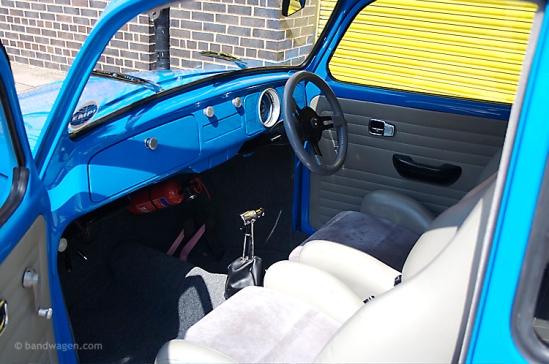
Interior:

Grey vinyl/velour high-back sports with matching side panels and rear seat.
 Grey carpets.
Grey cloth headlining. 
Short-throw T gearshift.
 Custom painted speedo.
Grey sports steering wheel. 
Fire extinguisher. 
80s Pioneer cassette player with 4x speakers on custom rear parcel shelf.
 Auto-watch Alarm & immobiliser.
 Billet dash knobs and door handles/window winders and buttons.
 Additional oil temp gauge.

 I say…Nicely  done!!!

Thanks for reading

Tim.

New for 2003 Fords Model T-100!

All new for 2003...almost.

Yes that’s correct for the 100th year of production Ford build a total of 6 Model T-100 to commemorate the year.

These weren’t restored cars, they were all new parts.  The bodies were made in Sweden, coupled with available aftermarket.  The engine, suspension parts, transmissions were created from the original drawings.

Model T Reproduction Engine


The T's transmission - could replace the original unit, however the gear pattern is not the same so the internal will not match up.

For more check out the PDF below.

http://www.mtfca.com/encyclo/T-100.pdf

Thanks for Reading.

Tim

Mustang Upholstery Front Seat Finale

So what I’ve I been doing lately car-wise?

Finishing up the front seats of Mustang and putting them back in the car.  Yes, I know I should have gotten all the new carpet and the heat and sound deadening but  I didn’t.  They are easy enough to remove so not really a big deal.  I did notice while the seats were out just how thin the carpeting actually was, there is nothing between it and the floor pans, I’ve got to get those done…soon…soon.

Here’s some shots of the final production.

Drivers seat


Passenger's Seat. This is the one I just finished.


Tim

1967 Olds F-85 Club Coupe Restoration

I bumped in to Bill Holtzclaw from Cartersville, Georgia, virtually (Facebook) and he shared a few pics and some detail on his restoration of a 1967 Olds F-85.

Bill's F85

“I am doing a full, frame-off restoration on this 1967 F-85 Club Coupe. It has a convertible frame, 442 suspension, steel crank 330, .030 over with W-31 cam and 2” intake valves, close ratio Muncie 4 speed and heavy duty 3.91 posi rear. It is a radio delete, heater delete, carpet delete car with the factory cloth and vinyl interior. The drive train is built and the chassis is being assembled. The interior is done, the chrome and bright work is done. Next, we’ll pull the body and put it on a rotisserie. It will be two-tone Crystal and Midnight Blue.”

“I’ve had a lot of interest in this project from some of the leading Oldsmobile collectors in the country. It is my version of what would have been a 1967 W-31, which was introduced in 1968. All of the parts to build this car back in the day were available as either RPO options or over-the-counter upgrades. The W-30 package was available as an over-the-counter package in 1967. The W-30 cam and the W-31 cam are one in the same, and the OIA kit will work for both small block and big block cars. So, it was a possibility! ”

The upholstery turned out awesome! He used NOS fabric for the seat inserts. The car was a factory carpet delete car with a near-perfect vinyl floor covering. “I cleaned it and had it dyed the color blue (same as dash pad) that I wanted. It looks absolutely brand new! I had seat belts custom made to stock appearance, and the standard steering wheel came out nice, too.”

Check out the vinyl floor covering

“I had the gauges restored by R&M restorations in Greenville, SC. The odometer was re-set to zero.”  The dash bezel was restored by Chrome Tech USA. They repaired the 44 year-old plastic, re-chromed it and then detail painted it. The radio and heater delete plates were purchased from Red Venom Enterprises. “They only make the radio plate, so I purchased two and trimmed one to fit the heater control panel and the PRNDL panel. ”

Bill did the polishing himself

He installed a Sunpro Mini Tach in place of the factory clock. Looks like it came from the factory that way!

Great Job - Bill!!


Final Product


Bill is also the owner of a 1967 Oldsmobile F-85 Town Sedan with “Police Apprehender” package.  It has the HiPo 330/320 hp, Heavy Duty Jetaway and 442 suspension upgrades.

Nice!!!

Might be why he’s known as OldsMoBill.  “I am also known as the “Oldsmobile Police”!” Bill states.

Bill, I hope you check back with your status from time to time and thank you for sharing.

Thanks for reading.

Tim

Mustang Upholstery Part V

I thought I’d take a minute finish up the write-up on the very first upholstery job.  I finished it up a two weeks ago and really missed driving the Mustang, but that’s what happens when you do your own work and you can only fit it between all the normal life stuff that needs to get done.

Yes, as I  was reminded twice by a couple of car acquaintances, I used a kit, some say they aren’t much different from slip covers, but as you can see in my shots here that’s a bit of an understatement.

Now these next two videos are not all that great but I think you can see the removal of the back and the fasteners.  I’ve worked with these type of fasteners before in my father’s body shop (back in the early ’70s) nearly all door panels and seat back were fastened in that way.  They work really well but bend them (and they do bend easy of they aren’t aligned with the hole and pressure is applied) and you’ll have to spend sometime reshaping them, even then they might not hold properly, or replace them.

Check out the videos:


Here are a few more photos and the finished product.  Not to bad for my first one.  I have the passenger’s side to do.

With the plastic seatback removed.

Needed to remove the back release

2 piece

release removed.

Helpful hint:  All the hardware and fasteners have to pass through upholstery.  Rather than  try to cut holes, I made X cuts and pressed the screw or hardware through.  This made it as tight as possible.

Markings on the Foam

Good shot of the cloth sleeve with the wire passed through.

Here you would pass the hog wire while in the hog-nose pliers through the cloth between the upholstery and the wire.  You then have to shove this down between the two pieces of foam and grab a spring.

Finished product.

Replacing the seat track was done before I married the bottom and back.  Placing it back in the car was a little tricky..until I figured out that moving the set on the track was the way to get the studs to drop back in to holes in the floor board.

Over all this was not as tough as I thought it would be.  The passenger side will be quicker.  I’ll post the final product on that side.

Thanks for reading.

Tim


Mustang Upholstery Part III

Sorry it’s been more than a couple days…a week plus actually.  But hey, it 115 degrees in my garage.

So I removed the seat and inspected the underside.

Again this was my first upholstery job, ever.  So removal of the old upholstery on this first seat was a learning experience so I didn’t get too many shots.

Here is a shot of the seat out of the car.

Seat Out

You have to remove the plastic covers for the hinges and the rest of the hardware to separate the bottom from the back.

Just a couple of screws to remove the covers, hinges and hardware

Here is the underside of the seat with the track hardware still attached.

Back removed the track still in place.

The track is remove with 4 star bolts.  Be careful use the proper socket, I happened to have just purchased a huge set of tools (a bit more the ‘average guy’ might have) that had the necessary socket set.  If you don’t have those, find one of those universal sockets that ‘form’ to bolt.

4 star bolts hold the track to the frame of the seat bottom

Bolt and socket

Part IV coming up tomorrow.

Thanks for reading

Tim