Take a look at the Stang at #BarrettJackson…wait for the special appearance of SR73 at the end.
Enjoy!
Tim

Take a look at the Stang at #BarrettJackson…wait for the special appearance of SR73 at the end.
Enjoy!
Tim
 by John Gibson on September 19, 2012

Before we dive into what is one of the most often overlooked tools in the average man’s garage, ask yourself the following questions: Where is my torque wrench stored right now? When was the last time I used it? What is the current torque setting at on it? How accurate do I believe my torque wrench is?
We’ve seen a torque wrench be as far as 16 ft-lbs out of calibration – Chris Raschke
Every garage, engine builder, or race team has a torque wrench, and we all use it a considerable bit! But when was the last time you gave more than a moments glance at your torque wrench? Without a doubt one of the most often overlooked and most used pieces of equipment in any race teams or home garage has to be their torque wrench.
A torque wrench is a relatively inexpensive piece of equipment when you consider how often we use it to create serious horsepower or to ensure our wheels don’t come flying off when we put the car on the ground. A typical “click-style” torque wrench will usually run between $100-$400 and if cared for properly can last quite sometime.
Ensuring Your Torque Wrench Isn’t lying to you
What happens though when your trusty torque wrench has seen a few years, and you are starting to doubt the results it’s giving you. “We’ve seen a torque wrench be as far as 16 ft-lbs out of calibration,” explained Chris Raschke of Automotive Racing Products.
NHRA Teams can walk over to the ARP tent and quickly see just how accurate their favorite torque wrench is.
ARP understands how crucial it is to have a torque wrench that is calibrated correctly. ARP works closely with many of the top NASCAR and NHRA teams as well as numerous engine builders across the country to supply engine and driveline fasteners.
ARP has spent 2012 traveling across the country to every NHRA event offering a special service to the teams and mechanics in attendance. ARP brings a torque indicator that allows teams to test their torque wrench settings. Teams can walk over to the ARP tent and quickly see just how accurate their favorite torque wrench is simply by giving it a couple of pulls.
“We test the torque wrench at 50 ft-lbs and 100 ft-lbs to give teams a proper reading,” continued Raschke. “We encourage and stress that everyone to bring their torque wrench to our tent and see just how accurate the wrench really is.”

|

|
Torque Wrench Maintenance Tips from Harbor Freight

Why It’s So Crucial To Check Its Calibration
ARP explained to us that they have seen torque wrenches as far as 16 ft-lbs out of calibration. It’s easy to think how dangerous it would be if it a wrench was -16ft lbs, but the important thing to remember is +16ft lbs would be just as dangerous, especially for engine builders.
For example, let’s say you are working on a Chevy Small Block and are installing the cylinder head bolts for a 18 degree standard port cylinder head. ARP recommends torquing their hex bolt kit to 70 ft-lbs in three increments of torquing.
This means at three different steps you are going to torque each individual head bolt first at 20 ft-lbs, then 40 ft-lbs, and then finally 70 ft-lbs. If you are torquing 16 ft-lbs to much or to little, you are setting yourself up for serious problems. You are either going to under torque or over torque your head bolts by 22% versus ARP’s recommended level!
Torque wrenches are often used to torque the lugs on a wheel before a car ventures on the track as well. We don’t have to go into a lot of detail here, you can imagine just how dangerous it would be to have a torque wrench that was under torquing your wheel lugs.
What To Do If Your Torque Wrench Is Off
Even if you take immaculate care of your torque wrench ARP advised us that mechanics should have their torque wrench tested once a year to ensure that it is calibrated correctly. If your torque wrench does happen to be off by a few ft-lbs then what is the best option?
“We don’t actually calibrate the torque wrenches that are a few ft-lbs off,” Raschke explained to us. “Most all of the popular tool trucks like Snap-On and others will send the wrench in for calibration. In fact Sears provides service for their torque wrenches.”
|
|

|
How To Avoid A Wacky Torque Wrench
The next question has to be, how can you avoid ending up with a Torque Wrench that is out of whack?
ARP explained to us that the biggest mistake they see people making is not taking proper care of the torque wrench, and offered us a few tips to ensure that you get the maximum life out of your torque wrench.
ARP encourages and stress that everyone to bring their torque wrench to their tent at every NHRA event, and see just how accurate the wrench really is.
Top engine builders and mechanics understand the importance of having a torque wrench that is measuring properly. This is why so many are now opting for the high dollar (some as much as $4,000) digital torque wrenches that can provide extremely precise measurements. But even these need to be checked often to ensure that the number you are seeing is the correct amount of torque that is being applied.
A torque wrench is a valuable tool, but if it is not properly used and cared for it can become your worst enemy. Don’t place your hard earned dollars and more importantly your lives at risk by assuming that the torque wrench you have is reading correctly after all these years. Get it tested and ensure that “tight” bolt is actually tight!
Right after I read this I went out and checked on my pair of torque wrenches.
One of them is old school. Looks like this:

This one is just laying around in one of my Mac Tool toolbox drawers.
The other that is similar to the one here in the article is in its plastic case.
Wonder which one I’ll use again?
Thanks for reading.
Tim

 My first major project was the trunk area. The weatherstripping as you can see from the picture (left) was dry rotted and peeling and I didn’t like how the backs of the tailights were exposed. I found out that standard coupes didn’t come with anything but a simple gray trunk carpet and a round piece of wood covering the spare tire. I wanted a cleaner look, so I purchased a plastic panel that came out of a 1978 Ghia to cover the taillight assemblies.

Posted: May 13, 2012 in Uncategorized
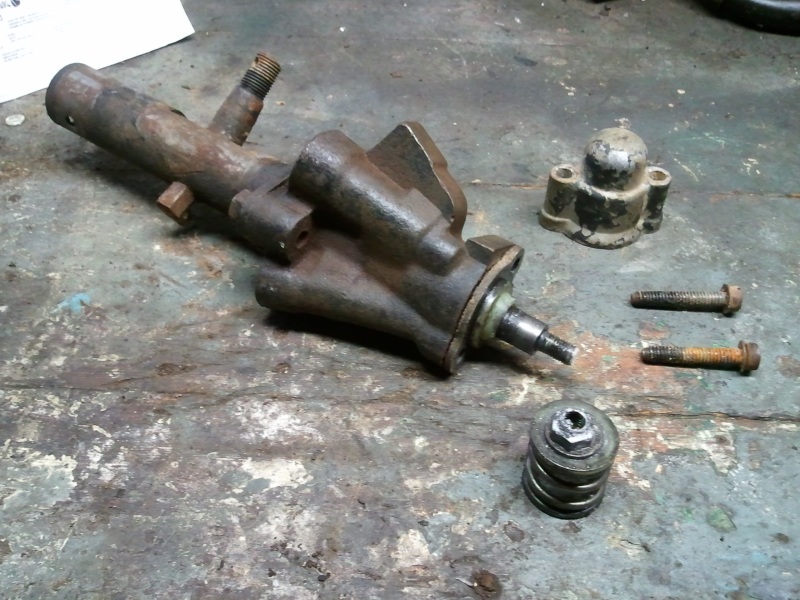
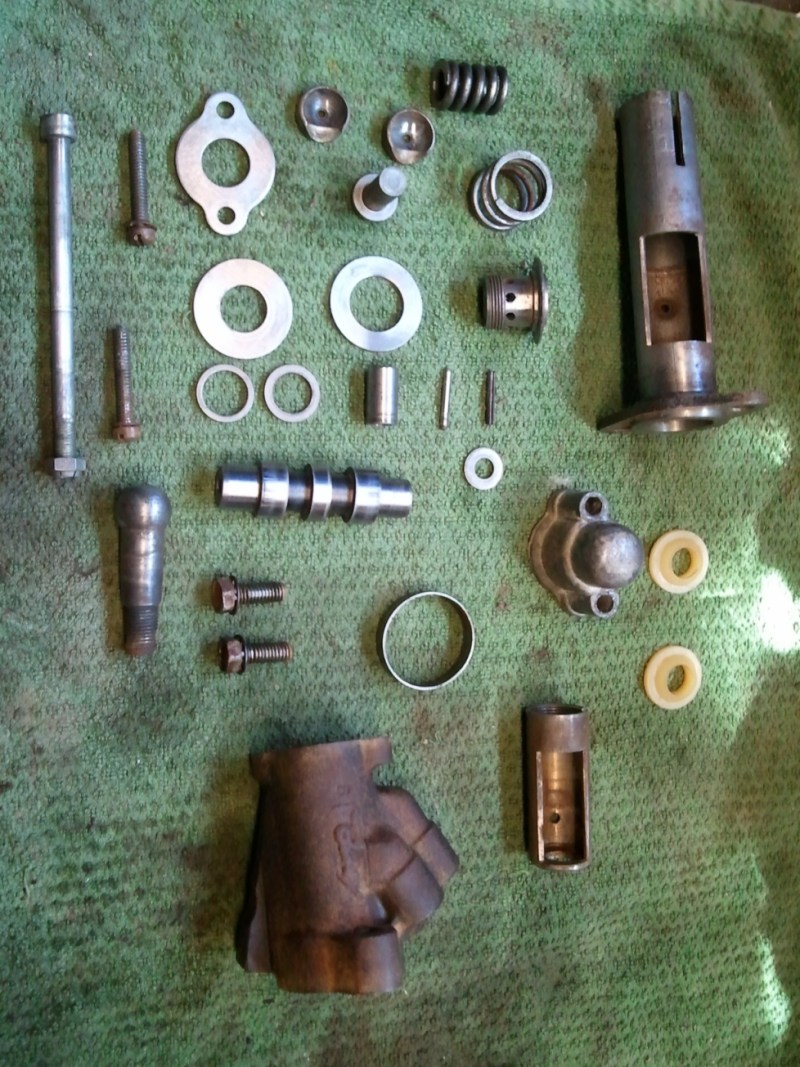
So I spent Friday night dismantling the control valve, in order to soak it all overnight for a Saturday morning rebuild. It all came apart relatively easy. After having it all soak all night in some super clean, I cleaned it all up an then soaked all the internals and housing in some power steering fluid. I rebuilt the valve with a rebuild kit and a new ball stud kit as well. Then I coated the spool valve spring and nut with some white lithium grease and installed the end cap.
I then painted it in some chassis black semi-gloss and installed the stud boot and retainer. All done!


Thanks for reading.
Tim
You can learn something new every day.
I remember when I was a kid, spending hours (when I should have been wet sanding primer or masking off a car) while working in my Dad’s body shop looking at the Chilton’s and other repair books, memorizing the front and rear configurations of each car – mostly the late 50’s and all of the 60’s. In the early 70’s there were still plenty of the old ones around – especially in the depressed economies of up-state New York. If they weren’t driving around you still saw them in the garages or on blocks in the backyards for sure, and often at the local stock car track. It was always fun to be able to pick them out and know the model and year.
Still I run across one or two models that I never knew existed. Even today with all the reading and all the online data, I don’t think I ever ran across a Hudson pickup truck. Sure I’ve seen (and love) the Hornets and the Wasps, but a pickup?
Sure enough after reading the Aug ’12 issue of Hemming Classic Car there is a mention in an article (about a guy who ‘hoards” Hudson ) of a 1946 Hudson Carrier pickup (don’t know way the didn’t bother to show the a picture – seems it ought to be rare enough).
So here are a couple of pics and some specs. I have never actually seen one in person.

1946 Hudson Carrier Pickup
They came configure like this:
212 CC L-Head Inline 6-Cylinder Engine
Carter 2-Barrel Carburetor
102 BHP at 4,000 RPM
3-Speed Manual Gearbox with Column Shifter
4-Wheel Hydraulic Drum Brakes
Front Independent Suspension with Coil Springs
Semi-Floating Rear Axle

They have great lines, for a pickup!
I’d love to see one in person and take it for a quick spin.
Thanks for reading.
Tim
I wanted to share this link because I was surprised at what Tom Pike does to some of the cars he modifies. We are talking 6-8 inches to a Challenger!!!!
Here are some highlights:
First that do it all in metal – no fiberglass
– they cut the front fenders and quarter panels from the top body line down and remove the factory sheet metal
– they add patch panels with thousands of welds
– they re-attach the factory fuel door and add a longer filler neck
– for this particular car they shaved the door handles and blacked out the turn signals and side markers
To this car they added 10 1/2″ wide tires in the front and 13″ wide tires in the rear!! They also lowered the car with Hotchkis suspension with coilover shocks.
It’s beautiful:

Tommy Pike’s Customs

WOW!!!
Oh… and the wheel are custom-made by MHT Luxury Alloys. The wheels are 3 piece and took 3 months to create.
WOW.
Thanks for reading
Tim
Here’s another parking lot find.
This pickup is good shape and that could be the original paint.

1956 International Pickup. (Try not to look at the white mustang!!!)

This is the S100.
This truck came with a 3.6L 220 cubic inch L6 and 3 on the tree (3 gears shift on the steering column). Love the hub caps.
Value of these truck can range between $11,600 in top condition to as little as $450.
These are great little trucks. Here is a little help when you need to shift your ’56 International.
[vodpod id=Video.16466954&w=425&h=350&fv=%26rel%3D0%26border%3D0%26]
Thanks for reading.
Tim
Next up…The trucks.
There were some beautiful and well done trucks at this show. Check them out!!

This pick-up was off in a corner of the lot...


There was a window crank between the two front windows for opening them up.
More coming up.
Thanks for reading.
Tim
No this isn’t going to be one of those talks and no we aren’t going to run out and hung a tree, ok…if you must…go ahead I’ll wait…..(insert bored whistling)……(more bored whistling)…..Ok…are you done?!!
As I get closer to getting the heads on the Mustang, I’m going to have to begin picking any changes I want made to the CJ heads. While cruising the web checking out options, I ran across this piece (Corvette related but springs are springs as far as an engine is concerned) and there are some good tips here.
Good reading.

Quick! What the fastest moving component in your engine? If you’ve taken a hint from the title of this article, you probably guessed correctly – it’s your valve springs, those tight little bundles of joy that open and close your engine’s valves.

Beehive springs come in a variety of shapes and sizes. The benefits of moving to Beehive springs where possible (and today few situations are not Beehive compatible) are many.
Beehive springs, such as those offered by COMP Cams, offer a huge number of benefits over stock-style cylindrical springs; reduced valve spring mass, faster valve acceleration, increased valve train rigidity, reduced valve train component stress and a whole laundry list of other positives.
Best of all, the word has gotten out and folks all over the country are using them for a wide variety of applications from street performance to extreme racing endeavors. That’s a really good thing.
Along with their success has come some confusion over exactly which beehive is right to purchase. Currently there are over a dozen beehive spring styles out there, each offering some unique take, be it in the seat pocket diameter, ovate wiring diameter, pitch or internal spring “frequency.” Regardless increased selection has bred some minor confusion, albeit easily cured.
Beehive springs are conical shaped springs that employ this powerful shape in the creation of a spring that can deliver both excellent performance and lowered seat pressures. With lower seat pressure, valve train components (especially the pushrods, rockers and lifters) are less stressed to perform the same work.
 |
 |
This beehive spring weights in at 99 grams, while a comparable conventional spring is 121 grams.
The difference between beehive and conventional cylindrical springs is obvious especially when you compare them in this manner. Note the dramatic difference in retainer diameter equating to less valve train weight.
According to COMP, effective beehive springs can support an additional 700rpm over stock cylindrical springs. How? It just stands to reason that the smaller coils at the top of the spring don’t require as much force to get the valve moving quickly, much quicker than conventional style springs. The higher rpm potential equates to better durability and performance.
There are some very knowledgeable engine builders who don’t understand how a single coil spring can be better than a dual conventional spring.
“Its like watching a race car running 60-foot elapsed times on the drag strip,” stated Bill Godbold, Chief Engineer for COMP Cams. “For example, take two identical cars with equivalent 500 hp engines.
“One has stock suspension and the other a sophisticated racing suspension. The car with the race suspension will get going more quickly and achieves better 60-foot time. The same principle works with beehive spring mechanics.”
Thanks for reading. Part II coming up.
Tim
WOW…I apologize for leaving you hanging for so long without finishing this interview.
Here is the link for Part I.
So while at first glance it did appear that there were just newly built vintage shaped bodies, placed on the C6 chassis, a really close look and you can see something very different about the shape.

The door is clearly still a C6 and the windshield is C6.
So you can tell that they didn’t just pull off that old C6 body and dump it out behind the barn.

You can tell this is the original C6 hatch. The rear end is has been changed but where the hatch meets the roof line is the same.
So how do they do it?
Well the make body panels that fit to the framework of the exiting parts. For instance, the rear hatch is striped of the outer panels leaving just the framework and the split window panels are fitted. The rear panel is pulled off and the rear panel with the split bumpers is placed on.
Jim showed me the shop photos of a C6 – skinned. They also retrofit C5.

C5 Rear hatch frame. The split window panel is manufactured by Karl's Kustoms to snap right on.
It is a pretty intense process.
They all the do is custom bodies? Oh wait until you see what’s next. (Yes I promise I’ll get right to it.)
Thanks for reading.
Tim


