My first major project was the trunk area. The weatherstripping as you can see from the picture (left) was dry rotted and peeling and I didn’t like how the backs of the tailights were exposed. I found out that standard coupes didn’t come with anything but a simple gray trunk carpet and a round piece of wood covering the spare tire. I wanted a cleaner look, so I purchased a plastic panel that came out of a 1978 Ghia to cover the taillight assemblies.
There was some rust around the trunk lid, so after removing the old weatherstrip (a nightmare!) I used rust treatment on the visible rust, and painted around the trunk lid and in the weatherstrip channel with white Rustoleum.
The next job was to install new weatherstripping, which I got from SSC Enterprises, but it did not go as planned. The weatherstrip dried all twisted in the corners and sticking out of the channel. I was so disappointed because I’d spent forever prepping and painting areas of the trunk and channel only to have the weatherstrip installation botched. I had to pull up the ruined weatherstrip, which thankfully did not cost a lot, but still, and scrape the adhesive off (again!) & repaint. Grr. Fortunately, around that time, I’d picked up a dremel tool with a wire brush and that made it a little easier than the first time.
After this setback I decided not to make a second attempt. Plus the next job would have been to replace the roof rail weatherstrip, which was supposed to be even trickier. So after ordering another package of trunk weatherstripping, I took the car to a body shop nearby and they did the trunk and roof rail for $95.
The last step was to find a jack assembly. The car’s original assembly was missing, so I bought a used one from another II owner and the jack assembly is now complete and correct. Plus I bought a new reproduction jack instructions decal and affixed it in the right spot next to the spare tire.
Here are the after shots:
Richard Cleer stumbled onto the 1946 Ford coupe his uncle built in the 1950s while searching for a flathead engine. He had to trade this tractor to bring the Ford back in the family.
By Angelo Van Bogart
Richard Cleer of Ipava, Ill., considers himself a Ford man and an International Harvester man, and he probably never thought he would have to betray his allegiance for one to get the other. However, that was the price Cleer had to pay when he retrieved a family heirloom earlier this year.
When Cleer found the 1946 Ford five-passenger coupe his uncle had hot-rodded in the 1950s just 25 miles from his home, he was actually following a lead to a 1939 flathead engine for another car.
“A guy said he had a 1939 Mercury flathead in the weeds,” said Cleer. “The engine in the weeds wasn’t right, so he said, ‘Maybe I have one in the barn.’”
The barn Cleer was taken to last fall was so overgrown with vines, trees and tall grass, it would have taken Indiana Jones to find it. When the owner cracked open the weathered red barn doors, Cleer saw the unmistakable shape of 1940s American iron.
Had he not been led to this overgrown barn, Cleer had little hope of ever stumbling onto the Ford his uncle built. Note the postwar Chrysler lurking in the barn; it was parked in front of the Ford.
“When he opened it up, I said, ‘That looks like my uncle’s old 1946 Ford,’” Cleer said. But he was mistaken. The car at the front of the barn was a 1946-’48 Chrysler. His uncle’s 1946 Ford was actually parked behind the Chrysler.
Cleer asked where the seller had bought the Ford coupe, and the man repeated the name of Cleer’s uncle. It had been parked since the early 1960s, not long after Cleer’s uncle sold it to the man. Cleer was able to further verify it was his uncle’s car, because all of the tell-tale modifications he remembered from his uncle’s Ford were still present. Blue paint still covered the Ford’s body, the push buttons were still in place to open the doors and the hood and deck lid had been de-chromed just the way Cleer remembered his uncle’s car.
Since the doors opened electrically and the long-parked Ford’s battery was dead, Cleer couldn’t determine whether the knob his uncle installed to open the deck lid from behind the seat was still there. Undeterred, he crawled in the side windows for a better look inside. Sure enough, that old knob was right where it should have been.
Despite Cleer’s excitement, he was told the Ford wasn’t for sale. Two months later, Cleer had worn down the Ford’s owner, although the Ford still wasn’t exactly for sale.
“He said, ‘If you want that car, you have to trade me for a John Deere tractor,’” Cleer said. “Well, I’m an International-Harvester man — I worked for International Harvester.”
Despite his allegiance, Cleer began searching for a John Deere tractor of the same value as the Ford, and one that would also satisfy the seller, to complete the trade.
“It took until May or June to find a tractor, because I didn’t want to get one he didn’t want and be stuck with it,” Cleer said.
Eventually, a John Deere was located at a dealership in Missouri, so Cleer called the Ford’s owner and asked him to call the dealership to make sure the tractor met his approval.
“He had the dealer run it for a half-hour, and he said it would be fine,” Cleer said.
After Cleer purchased the John Deere, the next challenge was retrieving the Ford from its approximately 50 years of storage. Although the brakes weren’t stuck, the Ford had been parked on a sandy floor, which helped preserve the sheet metal, but also caused the car to sink into the ground.
“It took four people five hours to get it loaded on the trailer,” Cleer said. “It had two flat tires, so we loaded it with used tires.”
After five hours of work, Cleer was finally able to retrieve the Ford from hiding. It was in remarkably good condition and exactly how his uncle had built it.
Once it was in the daylight, he finally had a good idea whether all of his efforts had been worthwhile.
“When I looked at it the first time, I didn’t have a flashlight and I didn’t know what it looked like,” he said. “It’s in really good shape — it’s really unbelievable. There’s just a little rust in the driver’s floor.
“It still has the same paint, and the interior my aunt put in it,” he added. “It looks like the seats and door panels are drape material.”
The Ford is still powered by the 1950 Mercury flathead with a 4-inch stroke that Cleer’s uncle installed with high-compression Edelbrock heads and dual 94 carburetors on an Edmunds intake. Cleer has already begun rebuilding the setup to make the Ford roadworthy again.
The 1950 Mercury flathead in the Ford still has its Edelbrock heads and Edmunds intake.
“I’m going to leave it that way,” Cleer said. “I had to pull the heads because it wouldn’t turn. I do all my own engine work but the machine work, and the machinist said [the engine] is in pretty good shape and the heads have never been ground.”
“It’s a good hot rod,” Cleer said, and one worth temporarily forsaking one tractor allegiance for another, even if the John Deere had the last jab.
“We had to use the tractor I traded to pull the cars out of the barn, and after we got the car loaded, I had to load the tractor and deliver it to his farm.”
I cleaned and painted the rear booster bracket. After rebuilding the booster, I have decided to bolt the booster to the Brake pedal assembly. It fit just as it should, and can now box, and store this assembly. One more part of the restoration done! 7,329 more to go!
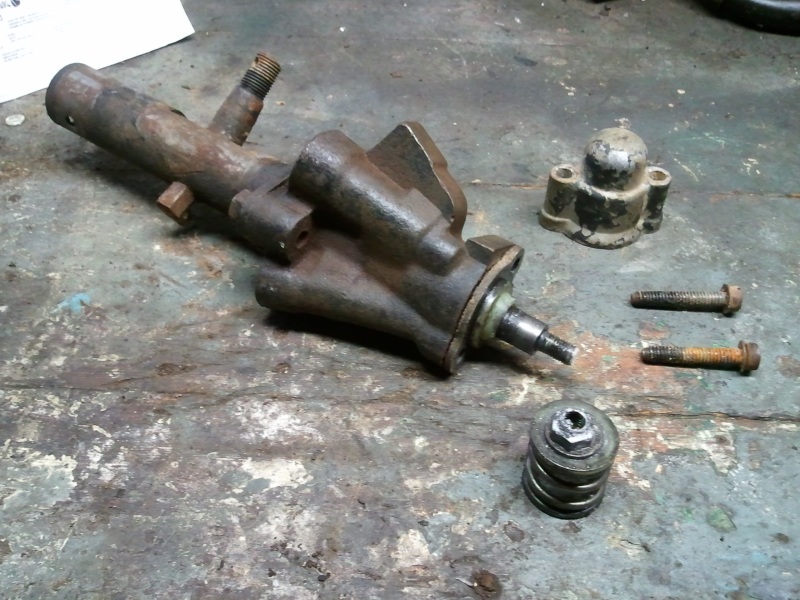
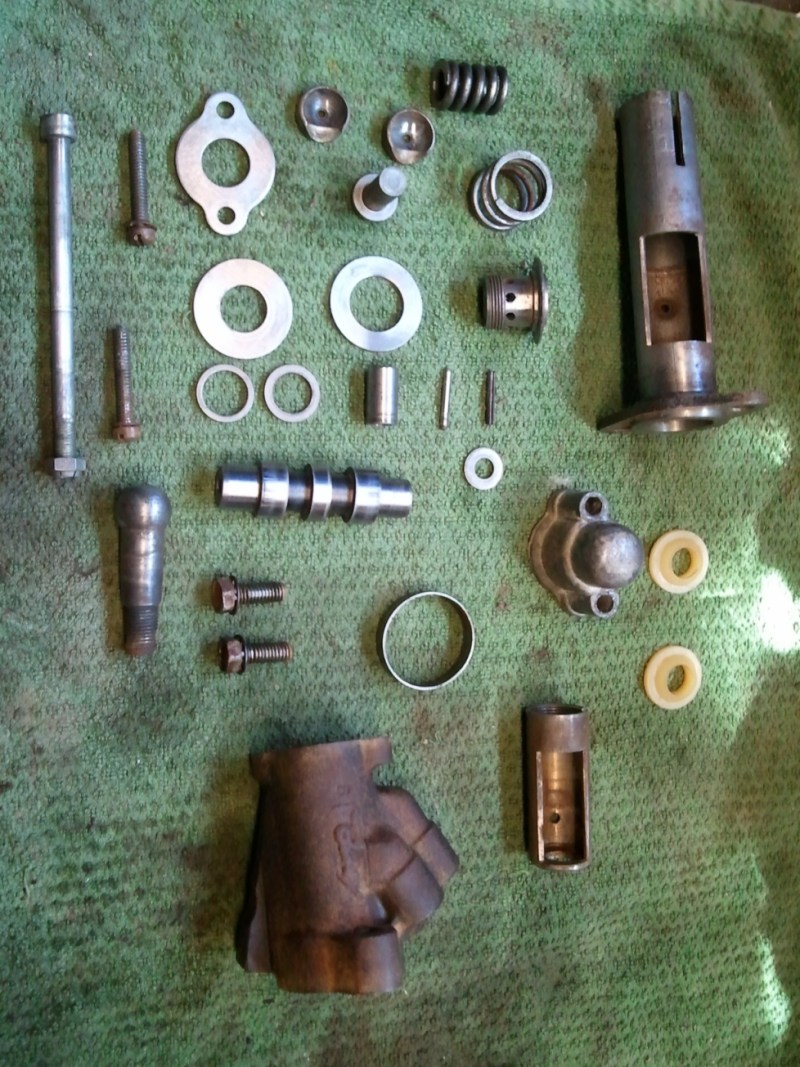
So I spent Friday night dismantling the control valve, in order to soak it all overnight for a Saturday morning rebuild. It all came apart relatively easy. After having it all soak all night in some super clean, I cleaned it all up an then soaked all the internals and housing in some power steering fluid. I rebuilt the valve with a rebuild kit and a new ball stud kit as well. Then I coated the spool valve spring and nut with some white lithium grease and installed the end cap.
I then painted it in some chassis black semi-gloss and installed the stud boot and retainer. All done!
When I first got the car, it had to warm up forever or it would stall. At stop lights, I had to be careful to feather the gas pedal to keep it from quitting on me. I enjoy an occasional adrenaline rush, but not at every intersection!
Anyway, our first order of business was to get the car running better. This would end up taking a while as we troubleshooted/fixed/replaced/fiddled with different parts of the engine over several months.
First, we ordered a rebuilt carburetor and my dad and I installed it. With the new carb, the car ran strong on straightaways with no hesitation but ran rough at slow speeds. After that, we did a tune up, replacing the spark plugs and wires, distributor cap and rotor.
Next, I drove the car to my brother’s place and he adjusted the fuel/air mixture, fiddled with the vacuum advance tubing, and reconnected the kickdown rod. The hesitation was 99 percent gone after all that. When I drove home I got stuck in bumper-to-bumper traffic and the car never stalled or overheated. Yay!
The last piece of the puzzle was the fuel pump, which was going bad. As soon as we replaced that (only $30), the car ran better than ever. Now I can drive it without worrying about being stranded (although I do have roadside assistance through my insurance so I can get a tow home if that happens).
Update: Even though the car is more reliable and runs smoothly now, the engine leaks oil, and could use a reseal. I’m hoping to get this done in September/October 2010 (more on this later).
Fins and Wagons w/2 or 4 doors, pretty much sums up the style for Dodge in 1957. With wheelbases ranging from 112 to 124.4 inches and curb weights of over 4000 lbs what the heck did they power them with?
Dodges were available in three flavors, Coronet, Royal and Station Wagon series with the Coronet and Royal coming in 2 and 4 door configurations and each had a convertible available and the wagon had 2 and 4 door versions.
57 Coronet 2-Door Coupe….Tell me you don’t like the fins!?!?!??!?
Here is the Custom Royal Lancer Convertible
The smallest engine available was Dodges in-line L-Head 6 cylinder. This was an iron block that displaced 230 cubic inches and had a bore and stroke of 3.25 X 4.8525 inches. It sported solid lifters and four main bearings. This managed to produce a compression ratio of 8.0:1 and topped off with a Stromberg one barrel carb (WW3-159) it made 138 hp.
The popular V8 was the Red Ram. This too was an iron block with overhead valves, displacing 325 cubic inches. The bore and stroke was 3.69 x 3.80 and compression was 8.5:1. Five main bearings, hydraulic lifters. In the Coronet and Royal series it made 245hp. In the Custom Royal it produced 260 hp. Why the difference? It might have been the carbs. The lower hp cars had the Stromberg Two barrel (WW3-149) and the 260hp cars had the two barrel Webber (WCFB-2532S)
325 Red Ram engine for the 57 Dodges
So that a nice couple of engines. But Dodge had a D-500 series which really wasn’t a separate series, just a set of high performance engines. Those are coming up next.
Meet Jon, one of our engineers here at Prestolite Performance. He is the focus of our first installment of What We Drive, our series of stories about the cars of Prestolite Performance employees. Jon got into cars when he was about 13 years old. His first car was a 1986 Ford Tempo that he worked on, but never got it to the road. His college car was a 1989 Chevy S10, which he beefed up by replacing the original 4 cylinder with a V8.
How Jon’s Camaro Went From 230 hp to Over 700 hp
Jon had been looking for a ’91 Camaro for some time, finding it difficult to locate one that wasn’t a rust bucket. In 2000, his search paid off and he purchased a nearly bone stock ’91 Camaro with only about 57,000 miles. The only performance upgrade on the car was a Flowmaster exhaust. Originally, the car made about 230 hp and 300 ft. lbs of torque.
The LB9 305 small block Chevy engine that was stock in Jon’s Camaro was removed to make way for a 355 small block. He hand ported aluminum Corvette heads and installed a Holley Stealth Ram intake with Mr. Gasket Ultra-Seal intake gaskets. Jon also made sure his engine was sealed for higher horsepower with Multi-Layered Steel head gaskets from Mr. Gasket. He made the engine even tougher with a forged ZZ4 crank, SRP forged pistons and a Comp camshaft.
Beefing up the drivetrain was also a priority so Jon installed a 4L80E transmission (built to handle 1000hp), Transgo shift kit, Lakewood transmission mount, SPOHN driveshaft, Detroit locker and Lakewood U-joints.
With twin 60mm Garret Turbos and his ACCEL 1000cfm throttle body and ACCEL Gen7 engine management system, Jon needed a hefty fuel delivery. His 5160FI fuel pump (now under Mallory) along with Mallory filters and high performance regulator provides the elite system needed for such a setup. For ignition, Jon used an ACCEL 300+ box with an ACCEL ultra coil and Extreme 9000 ceramic boot wires.
Now that Jon’s Camaro had been beefed up, he needed to harness the power with Lakewood 90/10 drag struts, panhard bar and control arms. He also needed better braking, so he installed 2002 SS Camaro brakes on all 4 corners.
All said and done, Jon’s beefed up ’91 Camaro now makes 700 hp and 800 ft. lbs of torque. That’s quite the improvement from stock.
As it turned out 1977 was one of the lower sales years. The average since 1974 was around 180k or more. For 1977 the sales number fell a bit short @ only 150K. (Believe it or not that was more than Mustang sales for the 1971, 1972 and 1973 models!!).
There was some excitement for the 1977 Mustang. For one thing the Cobra II could be had in white with red stripes and if that doesn’t stop your heart the options chrome luggage rack for the ’77 hard top coupe will.
You might be thinking, “Hey wait a minute!!! Did he say ‘hard top’? ‘Hard top’ as in there was something else? Like a CONVERTIBLE? THE CONVERTIBLE IS BACK?” Well YES, if you spell it ‘T-TOP‘.
That’s not a bad-looking car!!! Agree?
The huge option for 1977 was the T-Top. Frankly, I like T-Tops. I had a Camaro with a T-Top and loved it.
Engine line up was the same as the previous years with the V8 302 (in the Cobra II package) producing 139 hp.
The Cobra package also include honeycomb wheels (or I think they were referred to as ‘lacy’).
Yeah..I guess they are more ‘lacy’ than ‘honeycomb’.
Thanks for reading and check out this blog. The owner overs some of her issues when restoring a 1977 Mustang.
Technology has come a long way in the car world. Early on getting 100 hp from an eight cylinder was tough, much less from a six cylinder. Now days you can get a V6 Mustang with a base horse power for up to 305. Add a super charger and you can squeeze out 427 hp from the same engine. Yes technology as come a long way. Really?That’s what I would have thought. Super charging has been around in the hot rod, drag racing world, for some time, but in a production, oh that’s fairly new (last 10 years or so). But reading an article from Hemmings Motor New dispelled this notion I had.
So you’re thinking how far back was super charging something for sale to the general public, 60’s maybe…70’s maybe? How about 1937?
Yes. A car company by the name of Graham produced a 6 cylinder coupe.
1937 Graham Coupe
Supercharger badging
That’s a nice looking coupe. Here is a shot of the super charged straight 6 and one of the charger it’s self.
Straight 6 cylinder.
The supercharger. This was Graham own design of a centrifugal super charger which they manufactured themselves.
They used this first on their straight eight engines then on the straight six. They preformed so well that they nearly equaled the power of the eight-cylinder. The car was lighter with the smaller engine and that helped it hit 60 mph in just 14.5 seconds by producing 112 hp. The car came into chassis lengths 116 inches which had 106hp, 199.1 cid straight six and 120 inches which had 116hp 217.8 cid straight six. What about gas mileage? How’s 23.95 MPG grab ya.
This another post where we are amused by the content of the write-up and this time the pics as well. At the bottom check out the very cool dash.
Here is an excerpt from the write-up:
“”Car stopped running due to a split in the intake. I could not find a replacement part, but have not looked in 6 years. I talked to a machine shop about fabricating the part, but just never followed through. At the time, this was the *only* thing mechanically wrong with the vehicle, although this was over 6 years ago.
Please excuse my dog and my thumb in the pictures. Dog and thumb not included.””
Thumb
[——————————————————]
Dog
Thumb again.
[——————————————————-]
Ok, joking aside. I love this dash. Love the way the gauge clusters are separated and the AC unit in the center sitting on a shelf.
Is this a 360? I feel an engine spec article coming on.

 My first major project was the trunk area. The weatherstripping as you can see from the picture (left) was dry rotted and peeling and I didn’t like how the backs of the tailights were exposed. I found out that standard coupes didn’t come with anything but a simple gray trunk carpet and a round piece of wood covering the spare tire. I wanted a cleaner look, so I purchased a plastic panel that came out of a 1978 Ghia to cover the taillight assemblies.


 Meet Jon, one of our engineers here at Prestolite Performance. He is the focus of our first installment of What We Drive, our series of stories about the cars of Prestolite Performance employees. Jon got into cars when he was about 13 years old. His first car was a 1986 Ford Tempo that he worked on, but never got it to the road. His college car was a 1989 Chevy S10, which he beefed up by replacing the original 4 cylinder with a V8.


